Access Your Raspberry Pi With Web SSH & Remote IoT Monitoring!
Can you imagine accessing your Raspberry Pi from anywhere in the world, simply through your web browser? This capability isn't just a futuristic fantasy; it's a readily achievable reality, empowering you to manage and monitor your devices with unprecedented ease and flexibility.
The beauty of this approach lies in its simplicity. With a web-based SSH client, you bypass the need for dedicated software installations or complex network configurations. The web console acts as a standard terminal emulator, providing a familiar interface for interacting with your Raspberry Pi, no matter where you are. Whether you're on your PC, a tablet, or even your mobile phone, you can connect and control your device with just a few clicks. This opens up a world of possibilities, from remote system administration to real-time monitoring of your Internet of Things (IoT) projects.
Let's delve deeper into the practical aspects of remote monitoring, utilizing the power of the Raspberry Pi and secure shell (SSH). The Raspberry Pi, a compact and affordable single-board computer, has revolutionized the landscape of DIY electronics and IoT projects. Its versatility and ease of use have made it a cornerstone for developers of all levels. With a Raspberry Pi at the heart of your system, you can create sophisticated remote monitoring solutions tailored to your specific needs.
The Raspberry Pi serves as the central hub for collecting and processing data from your IoT devices. It's like the brain of your operation, gathering information from sensors, processing the data, and making it available for analysis. SSH, on the other hand, provides the secure connection to this central hub. It allows you to remotely access the Raspberry Pi, giving you the ability to manage and monitor your system from anywhere in the world, so that you can see how the device behaves.
The process of setting up remote monitoring is relatively straightforward. You'll start by installing the necessary software on your Raspberry Pi. After this is done, open your favorite web browser and open the remoteiot portal. Once you click on the device, you'll be able to view the overview information, such as the hostname, device model, serial number, and operating system. A user can also view the system health status of the Raspberry Pi through graphs.
To summarize the basics of remote IoT monitoring, utilizing the power of the Raspberry Pi and the security of SSH, here's a helpful table that breaks down the key components and benefits:
| Component | Description | Benefit |
|---|---|---|
| Raspberry Pi | A compact and affordable single-board computer | Central hub for data collection and processing; ideal for DIY electronics and IoT projects. |
| SSH (Secure Shell) | A cryptographic network protocol for secure access | Secure remote access to the Raspberry Pi; enables management and monitoring from anywhere. |
| Web-Based SSH Client | An interface accessed through a web browser | Provides easy access, configuration, and control to your Raspberry Pi from any device with a web browser. |
| Remote Monitoring | Real-time access to system health and sensor data | Allows users to detect and remedy any potential problems by monitoring their SD card health, lifetime, and disk errors. |
| Remote IoT Portal | Web Interface to see Overview information of the device. | Allows users to view hostname, device model, serial number, and operating system. |
For an in-depth understanding of SSH and its applications, you can refer to the official OpenSSH documentation on OpenSSH Manual.
Now, let's consider the practical steps involved in setting up your own remote monitoring system. First, you'll need to prepare your Raspberry Pi. This involves installing the operating system (Raspberry Pi OS), and then the remoteiot service. The Raspberry Pi Imager tool, available on the official Raspberry Pi website, simplifies the process of flashing the OS onto a microSD card. Once the OS is installed, insert the card into your Raspberry Pi and power it on.
Once the service is installed on your Raspberry Pi, the next step is to open the remoteiot portal in your browser and log in to the dashboard. There, you should see your Raspberry Pi listed among your account devices. This indicates that your device is connected and ready to be monitored.
One critical aspect of maintaining your Raspberry Pi is the health of the SD card. The SD card stores the operating system and your data, so its health is crucial for the smooth operation of your system. Fortunately, remote IoT platforms offer tools to monitor the SD card's health, detect potential disk errors, and estimate its remaining lifetime. This proactive monitoring allows you to replace the SD card before it fails, preventing data loss and system downtime.
The Raspberry Pi Pico W is a microcontroller board that can be programmed using MicroPython or C. This device further extends the capabilities of your project, as it provides additional data gathering and analyzing solutions. It can be programmed for a variety of applications, depending on the user's requirements.
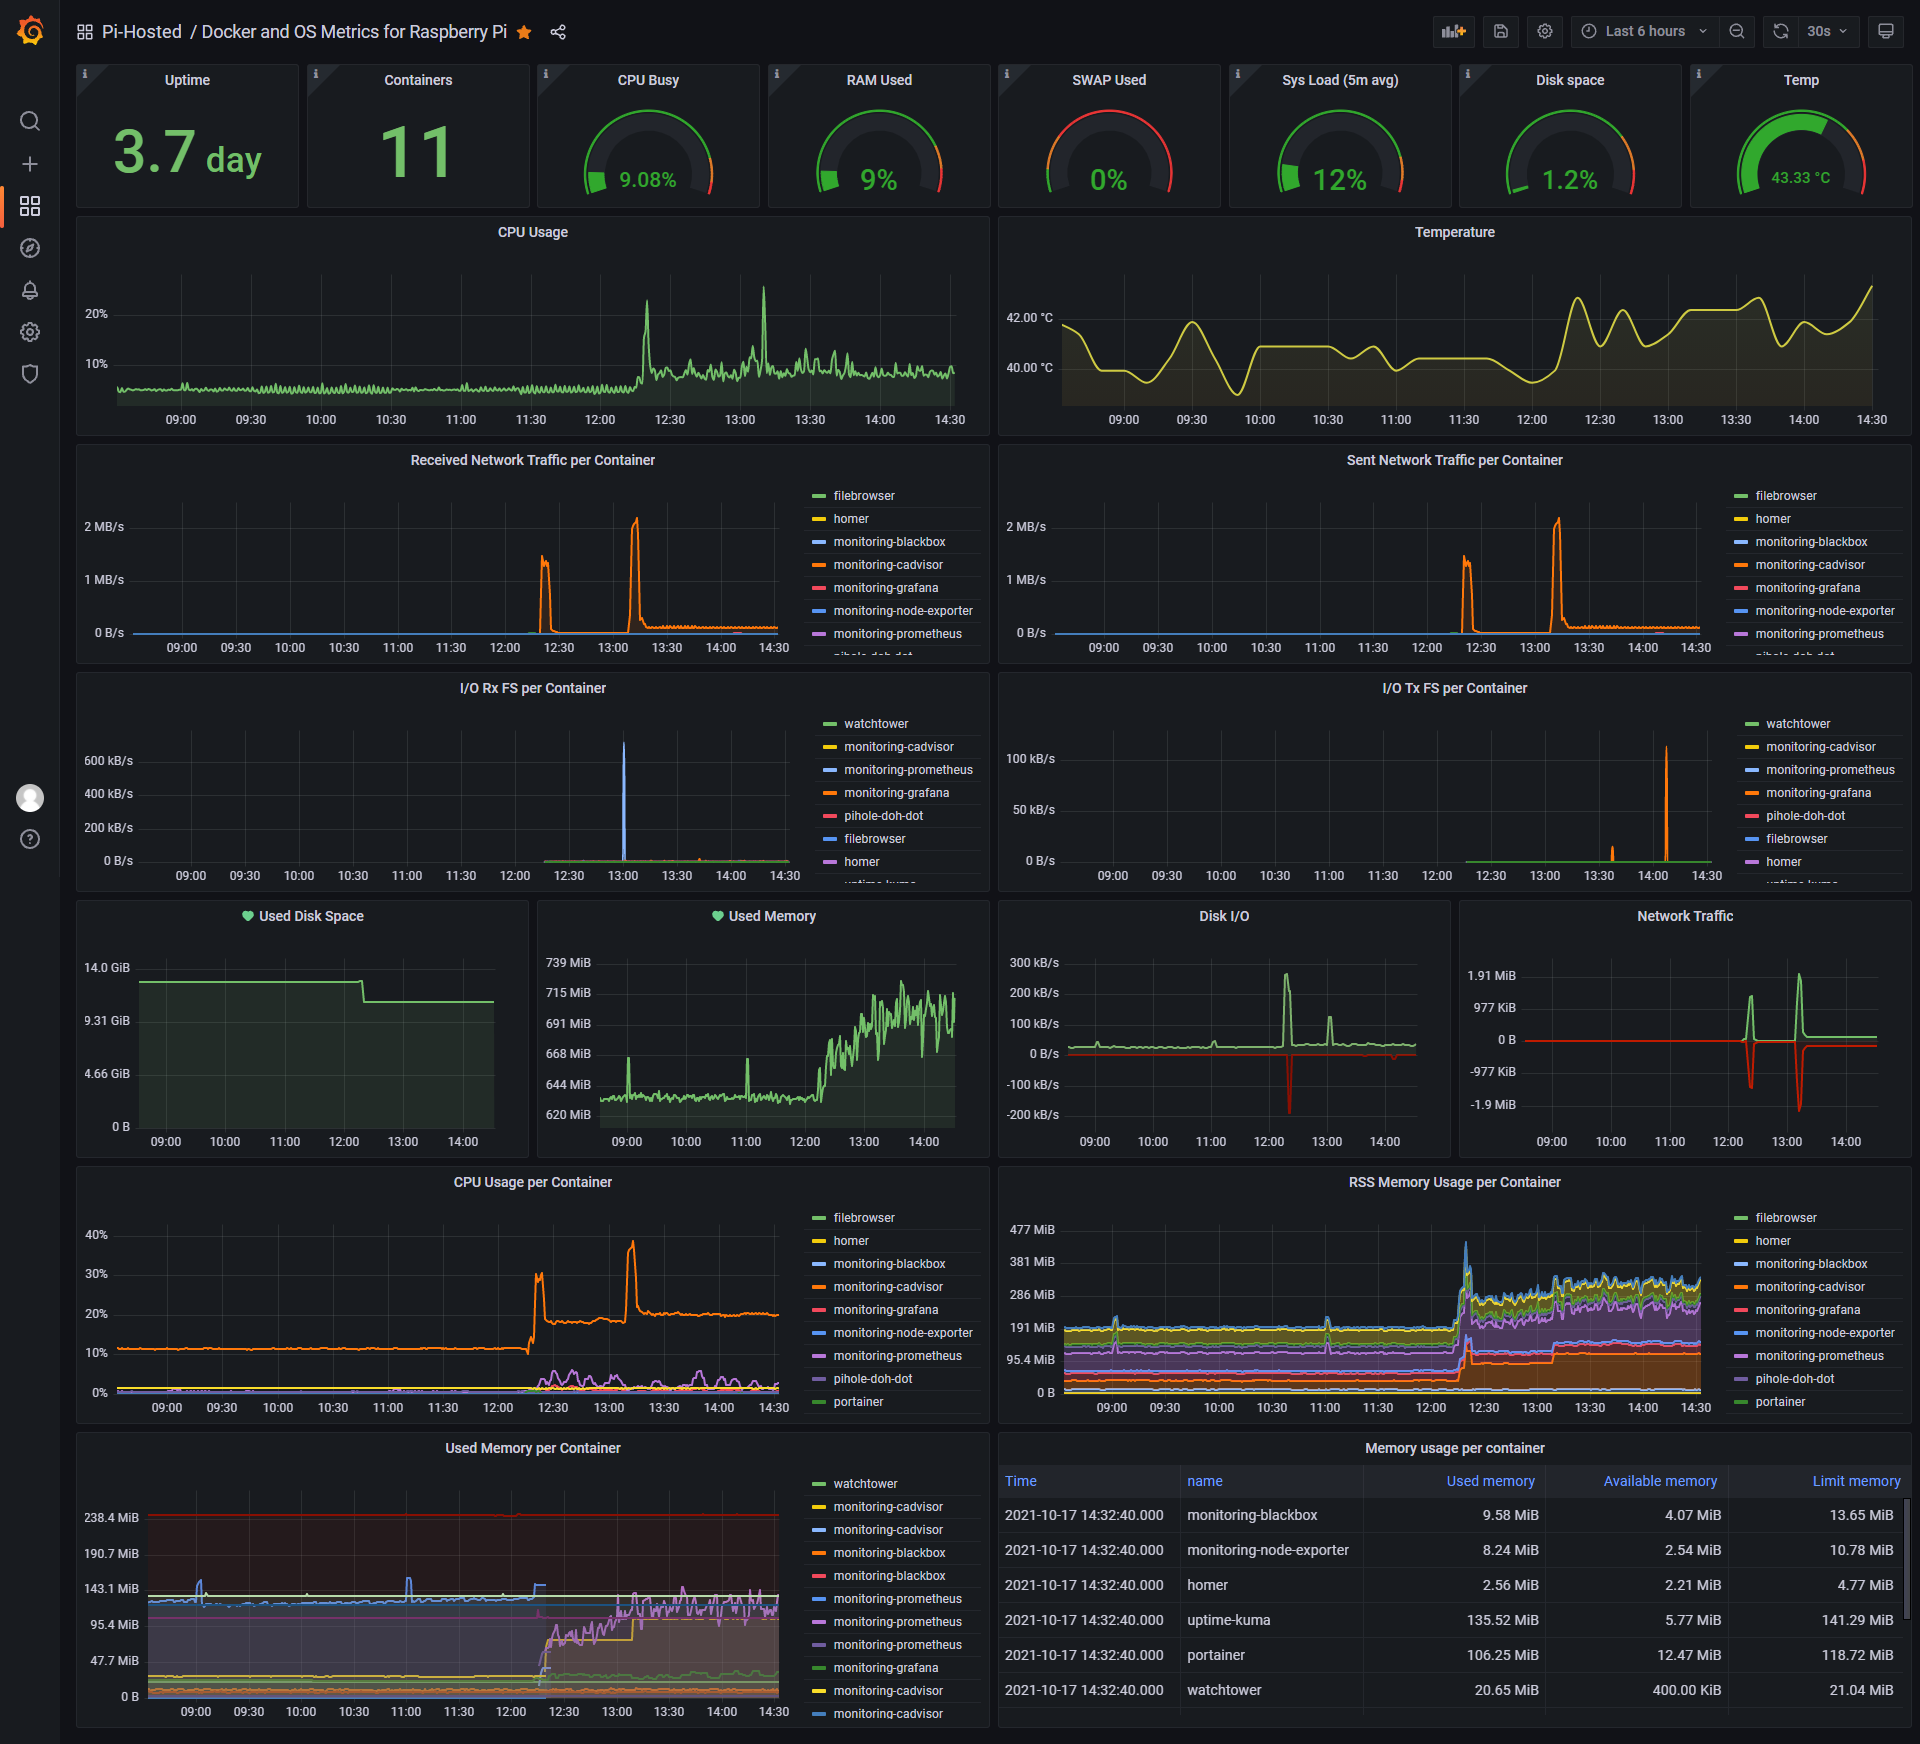
The "usage graphs" tab is an important feature of the remoteiot portal. It provides a visual representation of your Raspberry Pi's system health status. The graphs display metrics such as CPU usage, memory utilization, and disk I/O. By monitoring these graphs, you can quickly identify performance bottlenecks or potential issues that may require attention.
In addition to SSH, there are other software options for remote monitoring. These can include tools like Nagios, which is a popular network monitoring system, known for its comprehensive monitoring capabilities and its ability to send notifications when it detects issues.
Sensors are an integral part of any remote monitoring project. For instance, to keep track of a patient's health, a raspberry pi 3 model B, a GSM module, and specific sensors can be used. The sensors gather data, such as the patient's heartbeat and temperature, which is then relayed to the Raspberry Pi for processing and analysis.
So, why use a Raspberry Pi to build a DIY PC status monitor? There are several advantages. Compared to purchasing specialized hardware, using a Raspberry Pi can save you a significant amount of money. Moreover, you have complete control over the system, allowing you to customize it to your exact needs. You can monitor various aspects of your PC, such as CPU usage, memory utilization, disk space, and network traffic.
By leveraging the power of the Raspberry Pi and SSH, you gain the power to manage and monitor your IoT devices from anywhere in the world. The remoteiot portal provides an intuitive interface for viewing the status of your devices and taking action when needed. From system health monitoring to network configuration, the possibilities are vast.
Looking ahead, the future of IoT monitoring with the Raspberry Pi is bright. As technology continues to evolve, we can expect to see even more advanced features and capabilities. Here are a few trends to watch out for:
- Enhanced Security: With the increasing importance of data security, we can expect to see advancements in secure access protocols and encryption methods.
- Artificial Intelligence (AI) Integration: AI can be used to analyze data collected by the Raspberry Pi, providing insights and predictive analytics.
- Edge Computing: Moving more processing power to the edge, reducing latency, and improving responsiveness.
- User-Friendly Interfaces: Making the monitoring and control process even more accessible to users of all technical backgrounds.
In conclusion, the Raspberry Pi, combined with the power of SSH and web-based interfaces, offers a powerful and accessible platform for remote IoT monitoring. By following the steps outlined above, you can create a secure, reliable, and efficient system that fits your specific needs. With ongoing advancements in technology, the future of IoT monitoring with the Raspberry Pi is promising, offering even more powerful and intuitive solutions for managing and securing your connected devices.


